Main Content
Object: Learn how to respond to an event support request and how to assign resources.
|
1. With the exception of setups, most event support requests come in as tasks. In 25Live Pro, you can access tasks assigned to you from any screen by clicking the "Tasks" button on the top menu.
To read about tasks in greater detail, click here. |
|
|
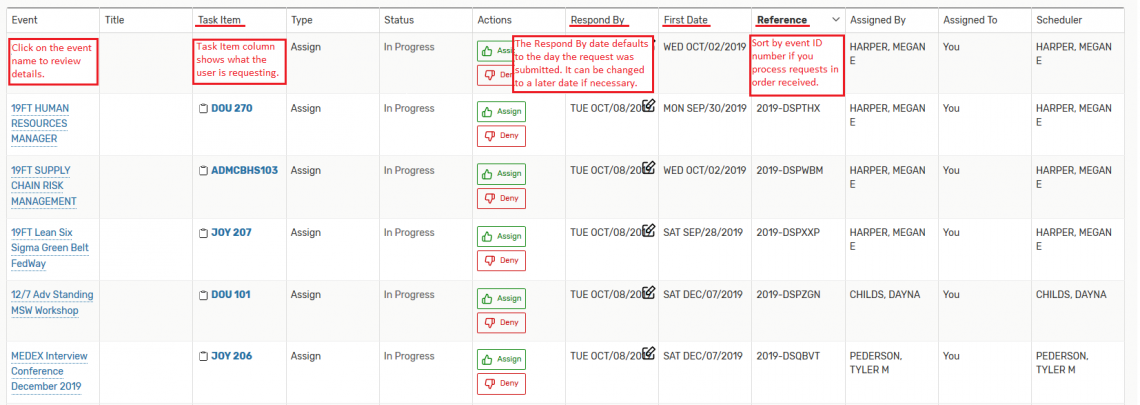
2. The "Task Item" column displays the requirement that the user selected in their event request or the resource that needs to be re-assigned if changes to the dates or times were made. Sort your results by event ID number if you process requests in order received (click the "Reference" column header once). If you want to process any same-day requests first, then sort by the "First Date" column.
All tasks are given a due date, or a Respond By date, which is the day the request was submitted. You may change the due date to reflect any scheduling timelines; this action may drop the task from your list until the new date indicated.
It is best practice to review the event details prior to acting on the task, so click on the event name in the first column rather than responding to the task on the results screen. |

|
|
3. Review all details, paying most attention to the requirements, comments and the dates and times. To see what room has been assigned to this event, select the Occurrences screen. |
|
|
4. After your initial review, click Edit Event. Navigate to the Resources screen and select the appropriate resource(s). Add a revision note with your initial's and date, then click Save.
|
|
|
5. Send a confirmation email to the user.
You can also use the email feature if you need more information about an event or have questions. It is recommended that you send all communication related to events from 25Live. |
|
